Chess Boards

My 2023 gifts for my brothers (doubling for both birthday and end of year) were two wood chessboards that I constructed out of walnut, hard maple, and gaboon ebony. They are part of my list of projects in life that I look back on and see as some of my favorite undertakings.
For the build process, I unfortunately did not take enough photos (I know right, me?). I have one at the very start, and then the next, the boards are mostly already built (but a few steps after that at least!). So this post will be more of a show and tell as opposed to a step by step of my process. However, I will take this moment to link over to the mountain dulcimer that I built in 2018. It is one of the coolest projects I have ever completed. And I did a much better job of recording the build process!
To start off, I cut the wood into 2 inch by 2 inch by 20 inch pieces.

I glued these together (alternating hard maple and walnut) to create a stripe pattern. Once that dried, I went back to the table saw and cross cut the board back into two inch pieces (across the direction of the original cuts). If things are already becoming confusing, I will link to this true step by step guide with proper pictures. We’re at step 6 there. Next I flipped every other of the new pieces, which created our central chess board pattern. I glued these together.
For the edges, this is where I inlaid the ebony. I had just enough walnut left for these longer outer pieces. I made rabbet cuts on the edge to to make room for small (1/8 inch wide) pieces of ebony (it is a quite expensive wood, so I use it sparingly).
This picture represents what is happening here.
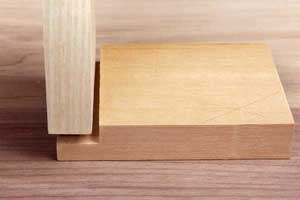 _Image: Rockler
From there, I made careful miter cuts to join the edges together. This would be step 12 for those still looking at the guide from earlier. This was one of the most difficult steps as the miter cuts must be as exact as possible to create a seamless joint.
I glued the edges to the central board, and I luckily now have a photo to show!

After the glue hardened, I used a ShopBot CNC to level the board (I did not have access to a planner large enough).

Here it is nice and even:

Next, I added hard maple splines to the miter joints to strengthen them. I used a block plane plus some sanding to remove the excess.


I would challenge this comment writer to a match anytime :) 
I routed the edges for comfort and created handles for lifting! And then spent a ton of time sanding :)

Here’s the upper side once finished with a specific long-lasting lemon coconut based oil.

And the underside (with my laser cut label)

Last, but certainly not least, the finished product with a fairly well matched set of pieces (purchased)

Overall, I love how they turned out. I luckily did not make any major mistakes (I did not have enough spare wood to redo any full piece). Because of that, I carefully triple checked every cut, and the final results are near to what I had originally envisioned. My brothers love them too.